It is the most terrible moment when a toilet doesn’t flush properly. It takes time to push the handle and mostly nothing happens. This is due to a blocked toilet or some reason for the toilet, not flushing.
A one-way diaphragm is used in the toilet syphon that helps to push the water up and down in the syphon tube. After some years of flushing, they get old and develop holes or get weak. This is when toilet syphon replacement is required.
In this article, we will explain the syphon system, what to do when the syphon fails and how to change a toilet cistern syphon in different toilets with the least fuss.
What is a syphon toilet?
A toilet syphon is a one-way valve, often known as a "flap valve," that is used to accelerate the flush by utilising the inherent force of syphoning. This is due to the toilet syphon's unique ability to pump water up and down a tube like a one-way diaphragm. The water is subsequently forced to flow into the toilet bowl, resulting in the siphonic action, which forces additional water to be drawn from the cistern. When the cistern is emptied, the syphonic motion is then stopped.
How do toilet syphons operate?
A toilet syphon is a single or two-piece plastic appliance. It has a pipe, a pull handle, and a flap valve made of plastic on the underside. When you flush, the pull handle functions as a piston to lift the plastic flap valve, which activates the syphon and causes water to flow into the toilet bowl. The pull handle is connected to your flush handle.
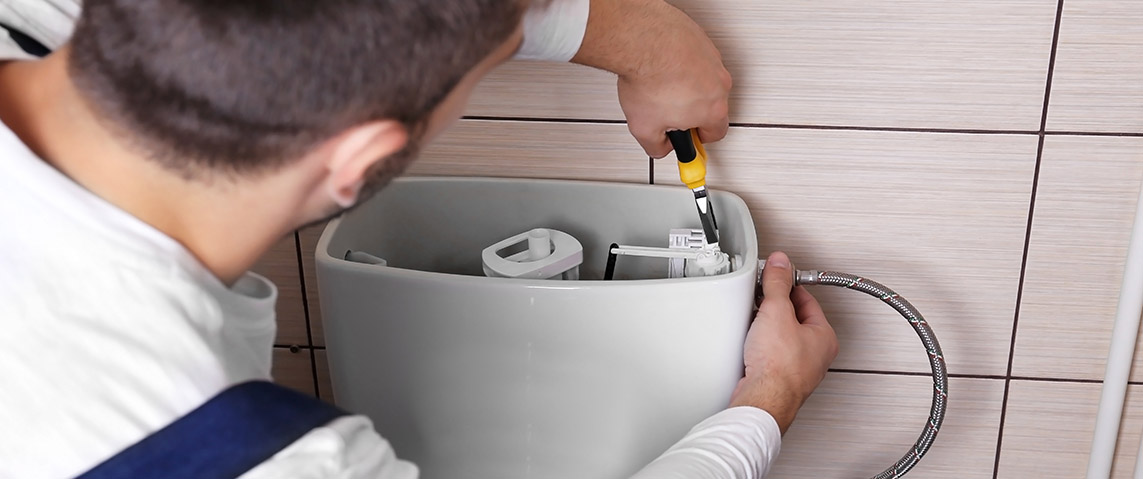
What are the steps for toilet syphon replacement?
It needs complete preparation before heading towards replacing the toilet syphon. This includes changing the supplies, making the toilet area clean and understanding the instructions before changing. So, let’s move towards the steps and fix the irritating issue.
Required materials:
· A Jug
· Sponge or waste cloth
· Towel (in case to catch water leaks)
· A plumbing wrench
· A new syphon
· Screwdriver
· Plumber’s compound
· Plumber tape
Getplumbing and drainage covernow
Signs that your toilet syphon needs replacing
- Weak flushes: If your toilet frequently struggles to flush waste completely, it could be due to a failing syphon not creating enough suction.
- Multiple flushes: Having to flush the toilet multiple times to clear waste is another indicator of a faulty syphon that's not properly expelling water.
Benefits of replacing a toilet syphon
- Improved flush performance: A new syphon will create a stronger siphon action, leading to more powerful and efficient flushes.
- Reduced water waste: A functioning syphon ensures proper water usage during a flush, preventing unnecessary water waste.
- Quieter operation: A faulty syphon might cause unusual noises during flushing. Replacing it can eliminate these noises and make the toilet quieter.
- Potential cost savings: While a replacement is a cost upfront, a properly functioning syphon can prevent future problems that might require a plumber's visit, saving money in the long run.
Tips to change toilet cistern syphon in a low-level toilet
1. The water supply area is normally located on one side of the cistern unit which should be turned off. If you cannot find it, turn it off from the main supply.
2. Check that the water has been turned off by removing the toilet lid and pressing the flush button. When the cistern empties and does not refill, you have correctly turned off the water.
3. Empty the remaining water in a mug or jar and soak any remaining with a cloth.
4. Remove the nut holding the water inlet valve in place. The water in the overflow pipe also needs to be disconnected.
5. two nuts attach to the cistern of the toilet pan and need to be removed.
6. Remove the fixings that attach the toilet to the wall.
7. Try to empty the excess water into the bath/sink. Also, make sure that the point of the toilet pan where the cistern sits is attached is free from debris as it may cause issues while sealing again.
8. Remove the syphon by laying the cistern back on the closed toilet seat.
9. The old sealant should be removed from inside and outside the cistern.
10. Fix the new syphon back to the hole and apply a good amount of the plumber’s compound around the joint.
11. Make the nuts under the cistern tight and rubber into the proper position. Ensure that the syphon is in the correct position, as it will enable the flush lever to be reattached and lets the ball cock move freely.
12. Replace the toilet cistern on the toilet pan and put the washer in place.
13. Attach the toilet cistern to the wall and lock the nuts.
14. Reattach the flush lever and ensure the flush handle is at the correct angle.
15. Connect the water supply again by using the plumber’s tape and pipe threads.
16. Turn on the water supply and check carefully for leaks.
Tips to change a toilet cistern syphon in a high-level toilet
Low-level and high-level toilets are fitted at different levels as the name suggests. Low-level toilets with cisterns are fitted low towards the wall while the high-level toilets are vice versa it. High-level toilets are a terrific design option and were often used in Victorian England.
Tips after the 7th from the low-level toilet can be used for changing a toilet syphon in a high-level toilet.
Tips to replace a toilet syphon diaphragm
When the toilet is flushed, this flap rapidly raises water into the syphon. With us, it may deteriorate or get damaged, necessitating replacement. However, you need not be required to change the entire syphon.
- For changing a toilet syphon diaphragm, you can use the low-level toilet syphon steps.
- After completing the steps, you can check for damage in the syphon on a work surface and if the diaphragm is torn, you can buy it separately.
- Remove the coupling pin from the top of the plunger.
- The housing unit is to be removed by pushing the plunger.
- Use a screwdriver to remove the washer.
- Change the diaphragm by removing the old one.
- Replace the locking washer.
- The diaphragm should be replaced in the housing unit and coupling.
- The replacement steps mentioned in the low-level toilet syphon should be considered in further instructions.
Replacement of a toilet syphon may be tricky but not hard. It might be time to consult a plumbing professional if you have reached a dead end and are unsure how to proceed. Smart Cover offersplumbing and drainage coverif you want to have real peace of mind about your plumbing. Our plumbing and drainage insurance helps with the possible repair costs associated with plumbing and drainage problems.
Conclusion
While replacing a toilet syphon can be a manageable DIY project, some situations may benefit from the expertise of a licensed plumber. For complex repairs or if you encounter difficulties during the process, don't hesitate to seek professional assistance to ensure a proper and lasting solution.
For complete peace of mind regarding your plumbing needs, consider exploring our comprehensive plumbing and drainage cover options. These plans can help offset the potential repair costs associated with unforeseen plumbing issues, including those related to your toilet syphon.


