Maintaining your central heating system is essential for prolonging its life as long as possible. To keep it working at peak efficiency, it will need to be drained and cleaned now and again. The most important thing is knowing how to do this properly to avoid damage to your central heating system.
Why is it important to know how to drain a central heating system?
Boilers are fantastic and essential appliances in the majority of homes across the UK, as they not only provide hot water but also circulate this hot water around the house through a system of pipes and radiators to heat the property and keep it warm. This is why it is essential to keep them in good working condition so that they can continue doing this job without any issues.
Draining your central heating system is important for several reasons, including; removing sludge, repairing a leak, or changing a radiator.
Why is draining a central heating system necessary?
Generally, draining your heating system is good practice for routine maintenance, it is recommended to do this every few years to keep it running smoothly. However, some people might only drain their system when there is an emergency, such as a leak or a more serious fault – this could be something like needing to remove the sludge build-up, when you need to change or remove a radiator, or when you need to add an inhibitor to your system to protect it from corrosion.
There are also times when you will need boiler repair work to be carried out, this will also require the system to be drained before it can be dealt with.
What tools will you need to drain your central heating system?
Before you carry out the work, you will need to make sure you have the correct tools for the job to hand.
- Spanner
- Screwdriver
- Towel
- Jubilee clip
- Radiator key
- Hosepipe
- Buckets
Signs that your central heating system needs draining
Even though regular maintenance is recommended, there are specific signs that indicate your central heating system is urgently calling for a drain:
- Cold spots in radiators: Radiators that remain cool at the bottom even when the thermostat is high could be clogged with sludge, requiring a drain and flush.
- Unusual noises: Knocking or banging sounds from the boiler can signify trapped air or debris that needs to be flushed out through draining.
- Reduced system pressure: A drop in pressure on your boiler's pressure gauge might indicate a leak or buildup that necessitates draining to diagnose and fix the issue.
- Increased energy bills: If your heating bills are inexplicably high, it could be due to inefficiency caused by sludge build-up. Draining and cleaning can improve efficiency.
- Visible rust or dirty water: Rusty water coming from bleed valves suggests corrosion within the system, which can be addressed by draining, cleaning, and adding a corrosion inhibitor.
Central heating cover: Essential
Draining your central heating (every 5-7 years) removes sludge and maintains efficiency. It might also be needed for repairs or adding inhibitor.
DIY or Pro?
Drain yourself if you're comfortable with plumbing and have a simple system. Otherwise, consider a professional for complex systems, leaks, or repairs.
Benefits of a Pro:
- Ensures proper draining and refilling
- Diagnoses and fixes leaks
- Handles repairs alongside draining
- Central Heating Cover: Peace of Mind
Smart cover's central heating cover sends a qualified engineer for breakdowns and covers emergency repairs.
Safety first! If unsure, consult a professional to avoid damaging your system.
How to drain your central heating system
During the process of draining your central heating system, it is worth noting that some boilers won’t work during this period, because of this, it is always a good idea to switch off your boiler before you start. This will allow the water inside the system to settle and cool down. Conventional heating systems need to isolate the water going into the header tank before switching off the boiler, however, if you have a combi boiler, you can simply switch it off and drain the water once it has cooled down.
It might also be worth draining more than one radiator during this process.
Step 1 – Switch off your system
Safety first! Switching off your boiler first and allowing it to cool down completely will ensure that you don’t cause injury to yourself. Once the pipes and radiators are completely cool, you can begin.
(If you have a solid fuel boiler, put out the fire using the proper steps and allow this to cool completely as well).
Step 2 – Cut off your water supply to your boiler
To prevent the system from refilling itself while you work to drain it, you will need to cut off the water supply. You will need to locate the stop tap to do this.
For combi boiler systems, you will need to switch off the boiler, and once it has completely cooled, close the mains stop valve which is usually under your sink.
If you have a hot water cylinder, there will be a pipe going from the cold water storage cistern that will have a valve on it.
Step 3 – Find the right radiator and the drain-off valve
In most cases, the radiator with the drain-off valve will be located on the lowest floor of your house. The valve will be located at the bottom of the radiator, on either the right or left side, and is often coming off at a 45-degree angle. This is where you will need your length of hosepipe, you will need to clip this onto the outlet and tighten it using a flat-head screwdriver to prevent the hosepipe from slipping off. Make sure the hose is placed so the water runs into a bucket or outside to avoid a mess. However, if you are draining this outside, do so away from any plants as there will be chemical inhibitors in the water. Also, if you are using a bucket, you will need to shut off the valve each time before you can empty the bucket.
Step 4 – Start draining the upstairs radiators
The next step in this process is to start draining the radiators around your home. You will need to open up the valve on each radiator before opening up the drain valve on the radiator with the hosepipe attached. This will ensure that the water can move freely and will drain out of the system. Starting with the radiators on the top floor of your property will make the water run faster throughout your system. You should wait for around 15 minutes before you open up the bleed valves on the radiators on the lower or bottom floor.
Step 5 – Close all the valves back up
Once the whole system has been drained, you will need to tighten the bleed valves and close off the drain-off valve. You should then remove the hosepipe from the radiator, however, make sure there is a towel handy to clean up any potential spills or drips.
Step 6 – Refill your central heating system
The next logical step in this process, once all the valves have been closed, is to refill your heating system. Check that all of the valves that were previously opened have been shut, as well as the drain cock on the radiator, and let the water fill the system back up. Once the feed tank has been filled back up, you should start by bleeding the downstairs radiators, and then move on to the ones upstairs. Your system should now be filled.
Once the system is filled and all of the valves have been tightened, you can now switch on the boiler’s power supply and wait for it to heat back up, then bleed the radiators once more.
Adding a chemical inhibitor to your system is highly recommended to help prevent corrosion and limescale build-up in the machine.
Troubleshooting tips for draining a central heating system
The system not draining completely:
If water keeps flowing even after closing the drain valve, there might be another isolation valve on the flow pipe that needs closing.
Air trapped in the system: If radiators remain cold even after bleeding and refilling, there might be air pockets. Try bleeding individual radiators again, starting from the lowest floor and working your way up.
Leaks appearing after refilling:
Double-check that all valves are tightened properly. If leaks persist, there might be a damaged connection requiring professional attention.
If your system doesn’t have a drain valve
Step 1 – Turn off your system and cut the water supply
Just like in the previous process, turn off your boiler and wait for the whole system, including the radiators and pipes to cool down completely. For a combi, turn it off and allow it to cool. For a conventional boiler, isolate the water and then turn it off.
Step 2 – Isolate the radiator from your heating system
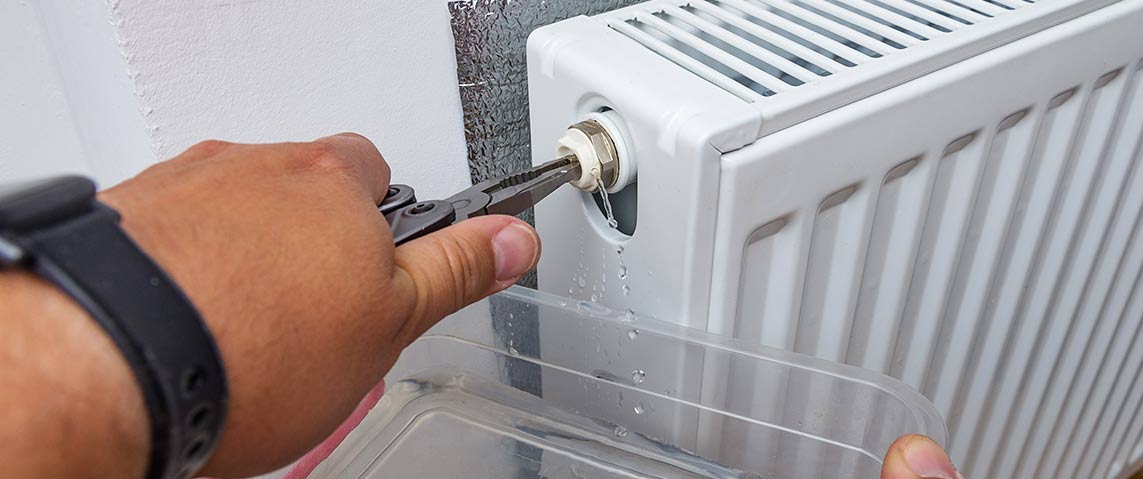
To isolate the radiator, you will need to close off two valves. One is the regulator or thermostatic radiator valve (TVR) which needs to be turned in a clockwise direction. Then on the other end of the radiator is the lockshield. You will need to remove the plastic cap and close the valve tightly, this may require pliers.
Step 3 – Bleed all the radiators
This process is similar to before, all you need to do is open up the bleed valves to let the air out of the system to speed up the draining process.
Step 4 – Loosen the union nuts
On the regulator or TVR side of the radiator, you will need to release the coupling nut. Next, place your bucket and old towels underneath to catch any spills or drips that may miss the bucket. Now you will need to use your adjustable spanner to turn the nut anticlockwise until the water starts to drain out.
Step 5 – Attach a hose and drain your system
Before attaching your hosepipe, make sure the radiator valve is in the ‘off’ position. To attach the hose, you will need a speed-fit tap or speed-fit draining fitting (make sure that your measurement is correct for your radiator pipe when you source this). Once this and the hose are connected to the radiator, you can begin to drain your system.
Be careful when removing the radiator from the wall once it’s empty, as the water inside can stain.
When to call a professional heating engineer for help
Lack of confidence: If you're unsure about any steps in the draining process or don't feel comfortable working with plumbing, it's best to call a professional to avoid causing damage.
Complex system: For complex heating systems with multiple zones or unusual configurations, a professional can ensure proper draining and refilling.
Suspected leaks: If you suspect a leak beyond a loose connection you can tighten yourself, and call a professional to diagnose and fix the leak before refilling the system.
Boiler repairs: If your central heating system requires repairs alongside draining, a qualified engineer can handle both tasks efficiently and safely.
FAQs for draining your central heating system
Q: How often should I drain my central heating system?
It's generally recommended to drain your system every 5-7 years for routine maintenance. However, you might need to drain it more frequently if you experience issues like cold spots in radiators or unusual noises.
Q: What tools will I need to drain my system?
You'll need a spanner, screwdriver, towel, jubilee clip, radiator key, hosepipe, and buckets.
Q: Do I need to turn off the boiler before draining?
Absolutely! Always switch off your boiler and allow it to cool completely before starting the draining process.
Q: Can I drain my system without a drain valve on a specific radiator?
Yes. You can isolate the radiator by closing the valves on either end and using a hosepipe connected to the union nut to drain it.
Q: What happens if there's air trapped in the system after refilling?
Air pockets can cause cold radiators. Bleed the radiators individually, starting from the lowest floor and working your way up, to remove trapped air.
Q: Is it safe to use the drained water for watering plants?
No, the drained water likely contains chemicals and inhibitors unsuitable for plants. Dispose of it responsibly.
Q: When should I call a professional to drain my central heating system?
If you're uncomfortable with the process, have a complex system, suspect a leak, or need repairs alongside draining, it's best to call a qualified heating engineer.
Conclusion
As you can see, draining a central heating system is not rocket science, and with the right tools and skills, anyone can handle the work. However, if you still do not fully understand how to drain a central heating system by yourself and don’t want to risk causing any damage to your heating system, it is recommended that you contact a professional heating engineer. With smart Cover’s central heating cover policy, if your system breaks down they will send a qualified engineer out to your property as well as cover you against the cost of any emergency repairs that are needed.
Elevate your painting projects by addressing damp walls effectively with our insightful blog on "How to Treat Damp Walls Before Painting." Discover essential tips, techniques, and recommended products to combat dampness and ensure a durable, flawless finish.


